Wednesday, October 5, 2016

My Weekend Cake Disaster

Bear with me, this will be a little long.

This Saturday I decided to bake a cake; not just any cake but a very involved cake (the recipe was 3 pages long) from a real professional baker's website. I was full of ambition and excitement. It took me a couple of weeks to assemble the plethora of ingredients that no one has in their kitchen arsenal (unless you have questionable sanity). The cake included 5 parts - the cake itself, the meringue buttercream frosting, the toffee drizzle, the toffee crumble, and the little pipings of buttercream/toffee decoration on the top.

My spirits were high as I started the process of making the batter. I hand chopped 8 apples into small bits, cut out parchment paper circles to go in the bottom of my two round cake pans before greasing and flouring them. Feeling very professional I started up my Kitchen aid mixer and started adding the many ingredients. I had even remembered to set out the 9 sticks of unsalted butter that morning to soften. I might want to add here that I am almost blind as a bat. I have to wear reading glasses to see anything in front of my face. I read the directions carefully but slipped my glasses off briefly to go to the bathroom. Arriving back into the kitchen I grabbed what I thought was a teaspoon measure. You can already imagine, I am sure, what I grabbed instead; yep, a tablespoon. I did not catch the mistake and by the time the batter was done, in the oven, and baking had commenced. When I started washing the dishes I happened to glance down and notice the error of my ways. I had put in double the baking powder, double the salt, double the vanilla, and double the cinnamon. I wasn't too worried about the cinnamon part but the salt, vanilla, and baking powder had me concerned. I ran over to the oven and yanked it open and what was before me was a big, hot mess. Batter had lifted up and was spilling over the sides of the pans into my beautifully clean oven! Holy hell!! I grabbed potholders and started to draw the pans out and they spilled everywhere...on my potholders, my hands, the stove element...I invented a few curse words. I got out a cookie sheet and tried to maneuver the overfull pans on it and spilled more hot batter in the process. God help me. I cleaned up as much spilled batter as I could and the house was immediately filled with smoke and the smell of something burnt. I began to sweat profusely.

Moving on. Pans back in the oven, nerves tense, and heart pounding I moved on to start the toffee drizzle. Everything was going beautifully. I had the butter melted, the brown sugar added, pinch of salt and then needed to add 1/4 cup of whipping cream. I had not purchased this item because I knew I had some left from a previous recipe. I reached in, opened the carton only to discover it was molded. Are you serious?! I set the toffee aside...I'll deal with this later. About this time the timer goes off telling me the cakes done. I open the oven, look in and the cake is NOT done and more batter has spilled over onto the cookie sheet. UGH. Clearly this was a recipe that need three cake pans, not two. I reset the timer for another 5 minutes. After that, another 5. After that another 5. I'm getting more and more aggitated. I decide to move forward with the recipe while waiting for the eternal cake to bake. Thank God for a 2nd oven. I put my crumble on a piece of parchment paper and on a cookie sheet in the lower oven and set the timer on the shortest of the time given - just to be on the safe side and had a drink to calm my nerves. Timer goes off on the cake in the oven and I go check again for the 10th time. Cake looks done, so I pull it out. But I'm nervous. Is it even edible? I eye my apples knowing full well I don't have enough to cut up more for a 2nd batch of cake batter. I'm also out of softened butter, pecans, all-purpose flour and I almost used the entire bottle of vanilla with those 2 tablespoons of error. Could this day get any worse? Oh yes, it can. I tipped the pans onto my cooling rack and both cake layers crack in half. OMG. I lean over the kitchen counter until my forehead is resting on it and say a prayer for strength. The oven timer on the 2nd oven goes off signaling the crumble is done. I open the oven and the outer edges are all burnt. Devil get thee out!!! I grit my teeth and pull the pan out, burning my finger in the process. Nearly dropping the crumble and hot pan on the floor, I rescue it but still spill part of it on the floor. Both dogs come running and sniff and walk away. Is this an omen of some kind? My optimism is running thin.

I go and share with my husband and son about the cake screw up. Both of them, always eager for my baking prowess, give me a pep talk and tell me the cake will probably be fine. God love them both. My son comes in the kitchen and uses a fork to scrape off some spilled, baked cake off the cookie sheet and has a taste. "Mom," he says, "this is really good!" I look skeptical and he gets a fork full and gives me a taste. I am shocked. It's edible. I decide for today I am done with this recipe. I pour the partial toffee ingredients into a small plastic container and put a lid on it and leave it on the counter. I pick off the burnt edges on the crumble and put it in a container with a lid. The cracked in half cake layers remain on the cooling rack and I go relax a bit and let them cool. The recipe asks me to cut each layer in half with a serrated cake knife to make a total of 4 layers. I have never done this before. I don't even own a serrated cake knife but in the weeks preparing for this baking experience I have purchased one. Once the cakes are cool I go in and proceed to cut each one in half (remember, they are already in half in the wrong direction). To say this process went poorly is an understatement. Sawed in half would be the best description of what took place. I mean, they looked like I sawed them in half with a chainsaw. Not to be deterred, I carefully lifted each rough cut layer onto a sheet of plastic wrap and stacked them together on the counter. I shall resume this process tomorrow. I went to bed, happy my cakes were not a disaster though they would not look like they did in the picture.

Sunday morning I got up to find a big dent in the top of the upper layer. Apparently one of the cats had got up on the counter and attempted to step on it. No problem...it was covered with plastic wrap and it's nothing a little homemade frosting couldn't fill. I read over the frosting recipe multiple times to avoid mistakes made the day before. Glasses in hand I started the process of cracking 6 eggs to rescue only the whites. This part of the recipe was very involved. You had to whisk the whites and sugar over a double boiler until it reached 160 degrees on a candy thermometer. This was new ground for me! I had to search for a pan and a heat safe dish that would fit, just right over it since I don't own a double boiler. While the water heated up I realized I had misplaced the whisk attachment on my mixer. I searched high and low, getting more and more desperate by the moment, looking for that attachment, forgetting my pan of hot water. So you can imagine my "joy" at discovering the water had boiled out of the pan and the pan was "dry boiling" and starting to smell burnt. CRAP. After cleaning the pan and filling it with more water I finally remembered where the whisk attachment was stored and quickly retrieved it. Back to whisking the egg whites and sugar. Once I got the mix to 160
degrees, it was back into the mixer bowl and whisking on low until I had stiff peaks. I never got stiff peaks. Don't ask me where this process went haywire. I ended up whisking it for double the time hoping for peaks eventually but admitted defeat and added the rest of the ingredients. 9 sticks of unsalted, softened butter went in... 2 tsp at a time, as the recipe stated. The mix was soupy. Dammit. Reading past the instructions for the decorative piping for later I discovered in her notes section that if the buttercream was soupy to put it in the fridge for 10-15 min. Awesome! Into the fridge it went. I waited 15 min...still soupy. WTH. 15 more minutes... still soupy but not as much so. 15 more minutes... no change. We're proceeding come hell or high water. I tentatively start removing the plastic wrap from the cake layers and as I slide my hand underneath layer #1 to put it on the cake plate it crumbles into a million pieces before my eyes. Good God in heaven! Not to be defeated, I scoop as much cake crumbles as I can and dump them on the plate. I take a good spoonful of frosting and slam it down. Smearing with gritted teeth I pick up pieces of cake in the frosting as I smear getting madder by the minute. Unwrapping layer #2, I repeat the process with the same result. Are YOU kidding me?!!! I start to do the slam and frost process again muttering a few cuss words under my breath and realize I forgot to sprinkle the first layer with crumble. Forget it. There is no way to fix that now. I'll just put the crumble on the 2nd and 3rd and 4th layer. Cake is falling apart everywhere. Every layer is losing about 1/2 of the cake in crumbled pieces. I rescue the bigger chunks that have held together, smash them down on the lower layer, and salvage what I can. In the end, after the last layer of crumbs go on and get frosted and crumbled, I am covered in cake crumbs, the floor is covered in cake crumbs, but both dogs are doing the best they can to keep up and lick as much cake off the floor as possible.  I stand back, look at the mess before me, at the pile of dishes in the sink covered with cake crumble and feel victorious.

I never made it to the store to buy heavy whipping cream, so the toffee drizzle never made it on the cake. I also did not try using leftover frosting to make the pretty piping on the top of the cake because the cake had no real edges. I do believe if I added anything else to this disaster I was taking a huge chance of ending up with something that needed to be moved into a bowl. I will say this... my son was the first to be brave and have some cake after dinner. He told me the cake was life changing and the best he'd ever had. I smiled at him and told him to enjoy it because it would never be made in this house again. That recipe, by the way? Don’t ask for it. It went right in the trash!

Here's what the disaster looked like inside and out!

Did not look at all like the baker's version!

You can see my smash and crumble technique really well inside!

Monday, March 26, 2012

Spring Inspiration Contest {via Pinterest}

Hoosier Homemade is hosting a great Pinterest Spring Inspiration Blog contest.  I am entering my Pinterest  Board in her competition!  If you get a chance, go by and like my board or pin some of my pins!  You can find my board {here} 
Here's a sampling of some of my own pins:


Tuesday, April 19, 2011

Vanilla Bean Bundt Cake with Vanilla Bean Glaze

This wonderful recipe came from Sweetapolita's blog.  You can find her blog
HEREIf you have never stumbled upon it before, you should check it out.
She posts the most wonderful recipes.  This isn't the first I've made from her blog and
it won't be the last!
It is the first time I have ever used real vanilla beans.
What a neat experience too!  Felt so good to use something all natural.
Real vanilla beans are pretty expensive.  Especially if you use a good
quality bean.  But the flavor is unmistakeable!
I find using vanilla flavoring in liquid form can be over-powering in a
recipe.  Not so with the delicate vanilla bean!  Perfection!

You simply split the vanilla bean with a sharp knife and use the tip of
the knife to scrape out the black grit (which is the vanilla bean).  So simple!
I feel silly now avoiding using recipes with real vanilla bean :)

This cake was gobbled up by family and co-workers alike.  They went on and on
about how the cake wasn't too sweet.  Again, perfection!
I did, however, mess up on her instructions for the glaze.
I made the vanilla milk as she instructed and then added my powdered sugar
to it.  Needless to say, I did this backwards.  My glaze? Too runny.
I added more and more powdered sugar, but it was still too runny.
Next time, I'll make the vanilla milk and then add it to my powdered sugar! Duh!!

You can find Sweetapolita's recipe HERE


Tuesday, April 12, 2011

For Pete's Sake Pottery - a thank you!


About a month and a half ago, I was lucky enough to win a giveaway
from Bird @ Bird's Party blog HERE.  What did I win?
$50 worth of pottery from For Pete's Sake Pottery!! Heck ya!!

Susan Brown, owner of this wonderful hand-painted gift store,
has quite a talent for making beautiful pottery items.  Her painting skills are
extraordinary!  One we exchanged info back and forth, Susan allowed me
to pick from her many different pottery pieces, like these:

Cute glass pitcher

Awesome ceramic tray - how handy would this be?


Caaa-uuutee wreath, personalized!


Bunny plate - just in time for easter!


Bowl (for your jelly beans...they never last that long in our house!)

Everything she has is so cute!  It was hard to decide.  But I finally picked something!
I've been needing a dessert plate for a long time.  Something cute and great
to use to display sweets for my blog.  Susan was so easy to work with!
She let me pick my own colors and design and she made some awesome
color suggestions!

So... here it is...my new dessert plate, handmade by Susan!


I love it!!  She did an awesome job on it!  It is even better than
I imagined, if that is possible!  Thanks, Susan!
She also sent along the cutest little chick magnet for my
fridge and this little cutie: 

How cute, right?!!  It's over the top cute!
I thought I'd christen the dessert plate with some Supreme Bars! Mmm!


Hope you'll check out Susan's site on Etsy (web address above).
She's also on Facebook for those of you that use that!

Susan, I couldn't be happier with my goodies!  Thank you so much!

Friday, April 8, 2011

Scones...oh so delightful!


Scones are a wonderful quick bread style pastry (if you can call them that)
that is just plain delicious and tender with any fruit in them.
This weekend I treated my family to Blueberry Scones for
breakfast.  They were gobbled up fast!

Here is the recipe, compliments of recipes.com.

Blueberry Scones

2 cups all-purpose flour
1/4 cup packed brown sugar
1 T baking powder
1/4 tsp salt
1/4 cup cold butter (chopped)
1 cup fresh blueberries (or any fresh fruit)
3/4 cup half and half (I used 2% milk and it worked just fine)
1 egg

Directions:

Preheat oven to 375 degrees.  Cut butter into mixture of flour, sugar, baking powder, and salt.  Add blueberries and toss to mix.  In a separate bowl beat together cream (or milk) and egg, slowly pouring into dry ingredients, stirring gently with a rubber spatula until a dough, of sorts, forms.  Knead until it comes together but do NOT overwork.  Okay folks..I will warn you, this is a wet and sticky dough.  Don't be tempted to add more flour...not yet.  Divide the wet sticky mess in half and dump onto a very floured countertop.  Knead with hands covered in flour.  Prepare to make a mess! LOL  Mix as well as you can.  Pat out each half into a circle and cut into 6 wedges.  You will have a total of 12 wedges when you are finished.  Bake on an ungreased sheet about 20 minutes.  Best served warm, with butter, but delicious later after it cools too!  Enjoy!


Tuesday, April 5, 2011

Easter Decorations (on the cheap)

Not sure about you, but I just realized Easter is sneaking up on us fast!  This weekend I dragged out my Easter decoration tote and proceeded to decorate.  I realized, rather quickly, that I have a limited amount of decorations for this holiday.

I wanted a couple of nice table centerpieces but didn't want to spend a lot of money. Dollar Tree is great when you are faced with this predictament!  I was able to make 2 centerpieces for about $12.  I was able to make 2 because I already had a big candle vase that only needed filling.  I bought 1 vase from Dollar Tree.  Here's my creations:


This one uses a vase, 3 bags of gourmet jelly beans, 2 faux spring flower bunches,
and a roll of tule.  All of this came from the Dollar Tree for $1 each!! Total:  $7  This one, by far, is my favorite!!  And later?  We can eat the jelly beans!!!


This one cost a mere $5.  I already had the candle vase, plastic eggs, little bunny pick, and left-over tulle from the first arrangement.  I only needed 4 faux flower springs and some easter grass.

Have you made anything cute for Easter (on the cheap) lately?  If so... do share!
I have some areas in the house that need more decorations!!

I'm linking up with Stephanie's linky party  HERE!  Hope you will too!

UndertheTableandDreaming


Friday, April 1, 2011

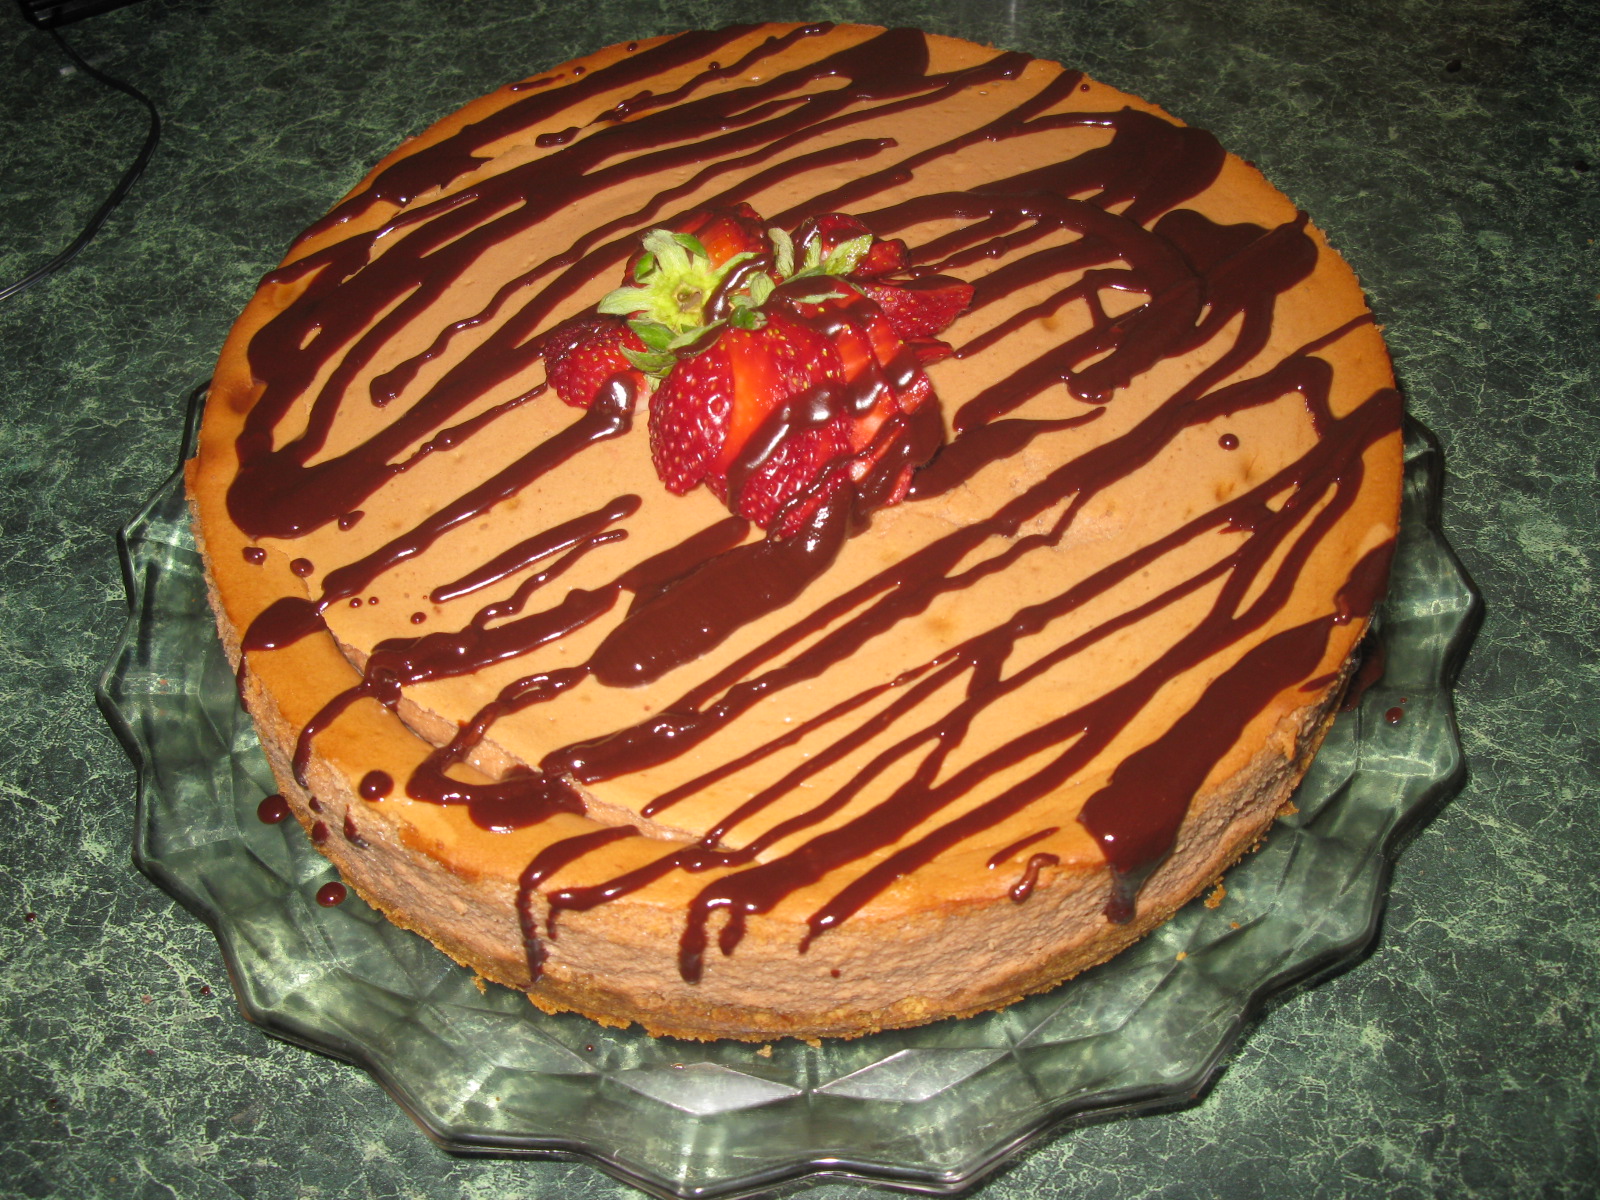
Heavenly Chocolate Cheesecake


It's no secret... I love me a good cheesecake!
I laugh and tell folks that there MUST be a special place in Heaven where
all they serve is cheesecake! mmmm...

This weekend I had the privilege of trying out a brand new recipe for
chocolate cheesecake.   I've never made a chocolate cheesecake!  I know...crazy! LOL
This recipe was simple but not for the faint of heart.
It took 2 1/2 whole whoppin' pounds of cheesecake to make it.
But man...oh man...is it good!

I'd like to thank LPC Interiors blog for her posting of this extra delicious recipe!
You can check out her blog HERE.  I omitted her lemon zest.  I am not a lemon
fan at all, especially in cheesecake.  But if you are, feel free to add 1 T of it
in the filling part! :)

Chocolate Cheesecake

Crust:

1 1/2 cups graham cracker crumbs
1 T sugar
6 T butter (melted)

Filling:

5 8 oz packages cream cheese - at room temperature
1 1/2 cups sugar
5 whole Extra Large eggs - at room temperature
2 egg yolks from 2 Extra Large eggs - at room temperature
1/4 cup sour cream
1 1/2 tsp vanilla extract
8 oz chocolate chips - melted (I bought a 12 oz bag and used the extra for the drizzle!)

Preheat oven to 350 degrees.

Crust:  crush graham crackers in a gallon size ziplock bag with a rolling pin.  Add sugar and melted - but cooled butter to the bag and rub back and forth to mix with your hands.  This keeps from making a big mess and dirtying up a bowl!  Pour into a 9" springform pan.  With your hands or the back of a metal spoon, press crumbs into the bottom of the pan and about 1" up the sides.  Bake for 8 minutes.  Cool to room temp.

Raise oven temp. to 450 degrees.  For the filling, cream cream cheese and sugar in a bowl with an electric mixer on medium high until light and fluffy.  Reduce speed to medium and add eggs and egg yolks, one at a time, mixing well.  Scrape down the bowl and beater, as necessary.  With the mixer on low, add sour cream, vanilla, and melted chocolate.  Mix thoroughly and pour into cooled crust.

Bake for 15 minutes.  Turn oven temperature down to 225 degrees and bake for another 1 hour and 15 minutes.  Turn oven off and open the door wide.  The cake will not be completely set in the center.  Allow the cake to sit in the oven with the door open for 30 minutes.  Take the cake out of the oven and allow to sit at room temperature for 2-3 hours until completely cooled.  Wrap and refrigerate overnight.  Enjoy!

This cheesecake recipe did not disappoint.  My husband and co-workers agreed it was the best chocolate cheesecake they had ever ate!  If you don't like chocolate, leave that part out and use all the other ingredients.

I added a simple chocolate glaze by mixing the remaining chocolate chips (melted) and about 2 tsp of butter melted together on the stove.  I poured this into a glazing bottle and drizzled over the cake after adding some cut strawberries to the center.

Monday, March 7, 2011

I'm Spoiled When It Comes to Popcorn!

I admit it...I'm spoiled... at least when it comes to popcorn!  I have had a love affair with popcorn all of my life.  It started when I was a kid.  My mom would pop up the delicious snack on the stove in a saucepan with lid because, back then (caveman times, my children joke), that was the only way you could make it.  Then, along came the microwave.  And, though I love the convenience, nothing tastes quite as good as the old-fashioned method of on the stove.

A couple of years ago we got one of those awesome new movie theaters
in town.  One with a water feature in the lobby, a huge menu of choices for
snacking, and many, many theaters.  I was spoiled, indeed!  But the one thing
they included that sold me most of all was that you were given the power
to butter and flavor your own popcorn! What?!! Yeah...heaven!
At this time I was introduced to this deliciousness....


This comes in many flavors such as white cheddar, butter, ranch (oh my goodness, it's good!), nacho cheese...  yum!  Now, my local Walmart has started selling these too!  I'm so spoiled now, I cannot tolerate just buttered, unflavored popcorn at the movies anymore.  I refuse to visit a theater closer to us because they do not have these powdered flavors!! Snobby, aren't I?! LOL

I am going to give you my wonderful husband's recipe for making "movie theater" worthy popcorn at home in your own kitchen.  Try it...you will thank me.  No, it's not good for you, but it is delicious!

Movie Worthy Theater Popcorn

plain popcorn kernels (we buy the cheapest we can find)
Orville Reddenbacher's Butter Flavored Popcorn Oil 
Pop Kernel Flavoring in your choice of flavor(s)
Vegetable Oil

In a saucepan, pour in just enough vegetable oil to cover the bottom of your pan.  Turn on burner on med-high.  Add a couple of dry popcorn kernels to the pan.  When these start to pop, your oil is hot enough to add the rest of your dry popcorn kernels. The amount varies.  If I want just a good sized bowl of popcorn, I will only add enough kernels to cover the bottom of the saucepan.  If you want more popcorn, add more! Cover with a lid and lightly shake the pan back and forth as the popcorn begins to pop.  Turn the burner down to medium and continue to move pan back and forth.  When popping stops, or slows to a pop between seconds, it is done.  Remove from the stove.  In a bowl, pour 1/4 of your popped corn in and sprinkle with the butter flavored oil.  Sprinkle with popcorn flavoring liberally.  I like to mix ranch and white cheddar together on my popcorn.  Add another 1/4 of the popped corn on top and season with oil and flavorings.  Keep doing this until all the popcorn is in the bowl, seasoned and sprinkled with oil.  Enjoy!


disclaimer:  I was not paid or compensated in any way for this post.  These comments are my own and shared from my own experience using all the products mentioned.

Friday, March 4, 2011

Fun and Disaster With Fondant

Fondant is so cool!  I really enjoy working with it.  If you have never tried it, you must!  It's like playdough for cakes! :)  I have worked with Wilton Fondant a few times.  It is almost fool-proof and so easy to tint in colors.  My first and second attempts with Wilton Fondant were very successful.  I have been quite popular at making belly cakes for ladies having baby showers.  Here's my two belly cakes:

I got brave and decided that I was ready to jump and make homemade marshmallow fondant.  The ingredients are simple and straight-forward.  You only need a microwave and lots of muscle.  But... boy did it whoop me...whoop me good. LOL
I shed a few tears on that project.  I read all sorts of blogs and watched video online giving advice for working with homemade fondant.  I still had a LOT to learn!
I used too much shortening on the countertop and too much on my hands not realizing that it changed the consistency to being too melty.  Even the heat of my hands messed it up!
I learned later that all I had to do was add more confectioners sugar to dry it back out, but at the time, I didn't know that!  I managed to finally slap the cake together.  My granddaughter could of cared less.  She was 1. LOL

One day I will try to make homemade fondant again and I know I will have learned from my mistakes.  But for now...it's Wilton or bust! LOL

Have you ever tried fondant?


Thursday, February 24, 2011

Eat Your Veggies -- or at least trick your kids into doing it!

How many times have you wished that you could sneak a little more vegetables into your diet?  It's especially difficult when it comes to kids.  There are those blessed few of children who love any and all vegetables.  But let's face it...we all could probably eat more.  Right?

Well, the following is a chili recipe that was given to me by my babysitter some 20 years ago!  She ran an in-home daycare and her fee fed our kids hot meals EVERY day!  Not macaroni and cheese and hot dogs, mind you, but she fed them real meals.  Even 20 years ago she was concerned about feeding them good, nutrious meals.  And, she would "sneak" in veggies sometimes.  This recipe is one example!

Crockpot Veggie Chili

2 lbs lean hamburger
1 onion (chopped fine)
seasonings (Mrs. Dash (original), Salt, Pepper
1 large can/bottle V-8 Cocktail Juice (secret ingredient)
2 cans pinto beans (drained)
1 package chili seasoning (she used mild for the kids)
shredded cheese
crackers (optional)

Cook ground beef (add seasoning with the meat) with chopped onions in a skillet until done.  Drain and rinse fat off with hot water and add to crockpot.  Pour in V8 on top of meat.  Add drained pinto beans.  Sprinkle in chili seasoning.  Cook on low for 4 hours.  Serve with shredded cheese and crackers.  Since all ingredients are pre-cooked, you can also make this quickly on the stovetop instead of the crockpot.  Basically add all ingredients the same as above and cook until hot.

This really is a delicious, mild chili with no vegetable taste.  But the V8 makes an excellent tomato base for the chili and gives the nutrients that makes V8 so healthy!  We've enjoyed this recipe for 20 years or so and I know you will too!


Tuesday, February 22, 2011

My Cake Balls/Truffles

Okay...here they are in all their glory! And, so far, the general concensus is that they taste great! :)

Monday, February 21, 2011

Bakerella Cake Balls and an Epic FAIL

My son told me the other day that the word "epic" has been talked about being removed from the dictionary because it is an overused word. What?! You can't remove a word because it's overused. Isn't that a form of flattery?

Well, the word epic describes what I did this weekend.

I made, for the first time, Bakerella's famous cake balls found here.  I'd been wanting to try them for some time. I have seen them all over the internet and blog world. So, if everyone's making them, they can't be too hard, right? Hmmm...
photo compliments of http://www.txcn.com/

Well, I followed directions to the letter and they "the cake balls" turned out just fine. The problem was when I got to the dipping them in chocolate/almond bark part.

This turned out to be quite messy and difficult. I don't have a double boiler so I "made" one with a bowl sitting on the edge of a small saucepan filled with boiling water. While it worked, I got multiple steam burns. Owww!

Okay...back to the epic fail part. I bought a package of vanilla candy melt. According to everyone's posted info., one package should sufficiently cover 30 cake balls. Well, I guess I rolled mine too small because I ended up with 51 cake balls!! Needless to say, I ran out of vanilla candy melt. No worries, I thought. I'll just melt some milk chocolate chips. I only had a 1/2 bag of those, so, of course, I ran out. ((sigh)) I found a couple of small bars of vanilla candy melt in my baking cabinet. When I melted it, it still didn't look like enough. So...my creative mind thought,"hey! I have some left over glace' in the fridge from my valentine shortbread and fancy sugar cookies." I scraped up a spoonful of the red glace' and added it to the melted vanilla candy melt. Oh my. Do NOT do this. I cannot stress enough here! It was one hot mess. Whatever chemical reaction happened, ruined the candy melt. It got very dry, first, which I am sure was from the powdered sugar in the glace' and then Ms. Brilliant, here, added a dab of water. What happened? It all wadded up together, after turning a pretty shade of pink (which I liked, by the way) and separated leaving it a wad in quite a bit of watered down glace.'  I almost took a picture of it, but it was too sad!  There would be no dipping with this mess! It clumped together like wax! What was I thinking?! 
I ended up putting the last 8 naked cake balls in a ziplock and freezing them and tossing the pink mess in the trash. Lord!

I will post a pic of the cake balls tomorrow. They actually turned out alright. Not as pretty as Bakerella's but, hey, she's done it longer than I have! I had visions of pretty, smooth cake balls. That did not happen. My candy melt ones look like little tiny scoops of ice cream. Not too bad, but not what I was going for. Not quite sure why they were lumpy. I stirred the stuff repeatedly. I have steam burns on my fingers to prove it! The kids said they tasted great. I tried one. Not my cup of tea. I am not a raw dough kinda person. I know these aren't raw dough but they reminded me of it, texture wise, and I just couldn't eat them.

Have you ever tried to make these? Any words of advice on the dipping part? What worked for you?

Wednesday, February 16, 2011

Dill Salad - Recipe Linky Party!!

 My all time favorite salad in all the world is one that I discovered on Land O' Lakes website.  It is called Dilled Garden Salad.  I discovered the recipe a couple of years ago while looking for something to fix for a summer get-together with friends.  I LOVE mozzarella cheese and I LOVE kalamata olives and look for any way possible to use them!


Photo courtesy of Land O' Lakes

My fellow blogger friend, Brooke, at All Things Thrifty is doing a fun "all things delicious" linky party.  I thought I'd share this delicious recipe for a salad with everyone!

The Recipe:


2 medium tomatoes, cut into bite-sized wedges
1 small cucumber, thinly sliced
1 small onion, cut in half, thinly sliced
1/2 cup pitted kalamata olives
4 ounces Mozzarella Cheese, cubed 1/2 inch

Vinaigrette

1/4 cup vegetable or olive oil
2 tablespoons white wine vinegar
1 to 2 tablespoons chopped fresh dill weed* (or use 1 tsp dried dill - which I do because fresh is expensive and I won't use it up and it'll go bad)
1/4 teaspoon salt
1/4 teaspoon sugar
1/4 teaspoon pepper

Directions

Place all salad ingredients except cheese cubes in large serving bowl; toss lightly.


Whisk together all vinaigrette ingredients in small bowl. Pour over salad; toss well. Refrigerate at least 4 hours to blend flavors. Stir in cheese just before serving.


I have made this the night before, leaving the cheese out until right before serving and that works great too.  The flavors in this salad with that vinaigrette are amazing!


Let me know if you try it and what you think!  I think you will love it as much as I do!


Sunday, February 13, 2011

Valentines Baking Craz!!

I've been in a baking mood!  This is really nothing new for me.  I love to cook and I love to bake!  My family aren't huge on sweets, so baking means fixing something decadent and taking it to work so my co-workers can indulge!

Valentines is tomorrow, and though it is not really a holiday my husband and I celebrate (we show our love all year long), I do love to decorate for it and bake for it!

Yesterday, I spent a gruelling, but well worth it, afternoon preparing a new sugar cookie dough recipe I saw recently on ourbestbites.com.  Her recipe was pretty simple but it managed to burn out my hand mixer in the process! LOL

I think this is the 2nd time I've burned out a mixer on sugar cookie dough.  Is there a trend here?

Her recipe was delicious!  I am not a fan of sugar cookies that are tasteless or that have lemon flavoring to them.  Her recipe used almond flavoring, not only in the dough but in the glace' icing! Yummy!!

It was a long, tedious process of mixing, cutting out, and then icing and letting the icing dry to add additional decorations but it was well worth it!

I think they're pretty when they are packaged up to give out at the office... what do you think?


I also made a new recipe from Land O'Lakes.  It was originally called White Chocolate Chip Shortbread.  I realized that I forgot to pick up white chocolate chips when I got groceries, so instead, I used regular mini-chocolate chips.  This recipe was pretty easy and fun to make.  I used some of my pretty rose colored glace' left over from yesterday's cookies to drizzle over the top.


What have you been baking for tomorrow's holiday of love?! :)


Friday, February 11, 2011

Shower Curtain Love

Call me weird but I am starting to have some serious love for my bathroom!  We bought our house about 3 years ago, and, while our master bathroom has some wonderful features (his and her closets, big garden tub, big vanity...) there are some features I really hated. 

For one...we had this awful, cheap shower enclosure blocking that big, gorgeous garden tub.  The doors on it weren't glass...they were textured plastic.  Ugh.  I hated them from the day we moved in.  After harping on my husband for about 3 months now...I finally nagged motivated him to remove them!  He had been dreading it for those 3 months, but turns out he dreaded for nothing.  Removing those shower doors proved to take approximately 15 minutes, from start to finish!  Ha!!  They left behind 6 holes in the wall of the shower enclosure but those were easily patched up with little plastic covers from Home Depot for under $2!  Using a little caulk remover (wonderful stuff) and a plastic putty knife, all the old, moldy silicone came right off and we had a nice, clean white tub.


Now...this brought me to the path I wanted to be on since we moved in... picking out a shower curtain.  Finally!!  At first, just to get by, we went with a plain, white vinyl shower curtain.  This was just until I made up my mind what I wanted to put up in there permanently.  Well...my two little kittens and two adult cats decided that vinyl curtain made for great fun and, in about 3 weeks, had it shredded completely!


The walls were painted a custom red color (we picked) to match our bedroom.  The trim is white.  So, I went with a red fabric curtain with a clear vinyl liner behind it.  Really, really like it!  The cats, believe it or not, don't even bother the clear liner now that there is a cloth one over it! Go figure!


For some time, I've been wanting a shower curtain with monograming.  I saw these two shower curtains at Ballards Design:


But...I was NOT in love with the price tag!  Plus...they weren't available in red.  I decided, why not MAKE my own monogramed shower curtain??  It could be done.  Right?


I own a lovely Cricut Expression.  I do not use this machine near enough to justify what we paid for it!  Nothing would make my husband (who bought it for me as a gift for Christmas) happier than to see me use it, right?


I have read on other blogs that you can now get flocked heat transfer vinyl.  Since my new shower curtain is cotton, this will work well on it.  It runs for only 6.99 for a 12" x 24" sheet @ Expressionsinvinyl.com.  I have ordered regular vinyl for my Cricut from them before.  If you consider doing this, remember that the heat transfer vinyls do NOT work on nylon or vinyl.  So if your shower curtain is vinyl or nylon, you'll need to just use regular stick on vinyl.


I plan to use my Cricut to cut out a monogram letter for our last name and iron this onto the center of my shower curtain.  I would like to either border the letter with a large circle cut out or a box cut out (similar to the 2nd Ballard pic).   I plan to use white flocked heat transfer against the red, which will match our trim. 


This bathroom has morphed into a theme, too.  My husband bought a wonderful, matted photo print from 911.  He and a friend visited NY a few years ago and bought it from a street vendor.  I'll have to post a picture of it because my description does not do it justice.  It is basically an 11 x 16 collage of the heroic efforts made to find people missing in the rubble.  In the background is a ghostly image of a close up of the statue of liberty and the flag.  It is just amazing!  I framed this myself and we hung it in the bathroom.  There are lots of shades of red in the photo.  I'd like to add some more artwork from 911 and/or patriotic prints in the future. 


These subtle changes to a room that had its pros and cons has now turned into a more favorite room in my house!


Do you have any rooms that you have re-done to help accentuate the positives?